
DIY: How to make a Cupcake Wrapper Holiday Wreath
This holiday cupcake wrapper wreath is a great kid's craft, so easy and fun. Be sure to hang it inside to protect it from the weather.  Supplies Needed: • Approximately 36 green cupcake wrappers for a 16" circle (a combination of foil and paper look best and add some nice dimension and color) • 5 mini red foil cupcake wrappers • Foam core (cardboard or a styrofoam wreath will work too!) • 1 large plate, 1 smaller plate • Pencil • Craft Knife • Glue Gun • Bow • Velcro or sticky back tape for hanging
DIY: How to Create Images within your Paper Snowflakes Here are the steps to creating your own paper snowflakes, which are great to use to decorate a dessert table or just add some wintery fun to your home.  Below are the basic folding steps to create any snowflake.  Now that you have your basic shape, it's time to draw your design. For the first snowflake, I chose a cupcake pattern. Remember, anything you draw on the folded edge will be mirrored. So if you draw half a cupcake, you’ll get a whole cupcake when you unfold your snowflake. Cut out your shapes. A sharp scissor and lightweight paper work great. You could also use a craft knife to get more detailed.  Notice the cupcakes?    Above I show you how to create a heart and a tree within your snowflake. Let it snow! Start with some simple designs and see where the scissors take you. DIY: Create a Twinkling Twig Candle Holder  | |||||||||||||||
| Simple DIY Twinkling Twig Candle Holder |


1. Gather your twigs, I used Forsythia branches. 2. Cut them into smaller pieces. 3. Coat with Mod Podge. 4. Sprinkle on your glitter. 5 and 6. Cut off the top of your white cup, leaving about 1/2"of the bottom. 7. Apply white glue or use a glue gun, and press your glittered branches into the glue. Let dry, insert your candle and enjoy the twinkling glow.
 |
| Closeup of Glittered Branches |

DIY: Create your Own Graffiti-Inspired Nails
I love creating my own nail decals. I find it so rewarding, so much fun and so economical. Try it for yourself.

1. Gather your supplies: a piece of plastic, 2 colors of nail polish, a scissor, a cuticle tool and clear nail polish.
2. Brush your first color onto the plastic.
3. With the tip of your cuticle tool or the end of a paint brush or pencil, make some "squiggles" onto your polish to create your pattern.
4 & 5. While your first color is still a bit tacky, cover it with 2 coats of your second color.
6. Once completely dry (overnight is best), with the tip of your scissor or tool, lift off a corner so it's easier to peel off.
7. Gently peel your decal off the plastic.
8. This is what it will look like
9. Cut your decal into smaller pieces.
10. Prep your nails with a coat of your second color. While still tacky, apply your decals.
11. Trim off the tops.
12. Clean up the edges with your cuticle tool and coat your nails with clear nail polish to seal your decals.
DIY: How to Make 3D Paper Stars
This is a perfect craft for your Fourth of July festivities! They'll brighten up any party.

2.
• With decorative side of paper facing up, fold
in half, turn, and then fold in half again
• Turn over
• Fold into triangle, open up, fold the
other side into a triangle and open up
• Now, tuck the scored folds into a 4
pointed star. This can take a bit of skill, but you’ll get there!
3.
Turn over and mark 1 ¼” from the straight side
edge into center. Do this on all 4 sides, then cut up to that dot on all four
sides.
4.
Fold flaps into center
5. Place
a bit of glue on one side of each flap
6.
Fold flaps over to adhere. Do this to both
stars.
7-8. OPTIONAL. If you want to hang your star, place a piece
of string on one of the flaps before folding over.
9. Now place some glue on the back of one star
10. Glue the other star to it, holding it in place for a bit.
DIY: How to Make New Wood Look Old10. Glue the other star to it, holding it in place for a bit.
I love to make new wood look old. It's very rewarding, not so difficult and a great way to get out some of your frustrations!
Gene and I tiled 2 of our kitchen walls and I had the idea to band the top of those walls with an old faux beam. He picked up some pine and I got banging!
Supplies: chisel, screwdrivers, hammer, chain, screw, nail, BBQ lighter or blow torch, wood stain and rag

2. Chisel out some chunks of wood. Small and large. You can do this along the edge, in the middle or both. Space it out.
3. I used a heavy chain and just banged it onto the wood. You can also create this effect with a hammer.
4. I wanted to create a Woodworm effect. I did this by lightly hammering in the tip of a screw (or nail) to create holes.
5. To create a more realistic Woodworm effect, I grouped the holes.
6. Using the edge of a flat head screwdriver, scrape the wood in an up and down motion. Try doing this against the grain.
7. This effect was created with a Phillips head screwdriver.
8. With a blow torch or BBQ lighter, lightly burn some of the areas of the wood. This will add a nice dark color to certain spots. Don't overdo it.
9. Once you've finished banging up your wood, it's time to stain. I applied Minwax Walnut stain with a soft rag. Let it dry before hanging.
Once the stain is applied, all the marks are revealed. I'm very happy with the results.

DIY: How to Make a Cute Chalk cloth Memo Board
I have this huge roll of chalk cloth I purchased years ago, so I'm always trying to find new ways to use it.
This is a simple project I created with some things around my house. This would make a cute back to school project as well.

 |
| Facci Designs Chalk Cloth Memo Frame |
1. Gather your supplies: Chalk cloth, wood frame, chalk, string, tape, scissor, tack, pencil
2.
Remove the glass and the cardboard backing from the picture frame,
place the glass onto your chalk cloth and trace around the glass.3. Cut out your chalk cloth
4. Before you write on your chalk cloth, you have to prep it. Do this by running your chalk back and forth, up and down on the cloth. Remove with a clean cloth. It's now ready to use.
5. Tape your cloth around the edges to the piece of glass. (Chalk cloth faces out)
6. With the chalk cloth facing out, place the glass back into your frame. Put the cardboard backing back in the frame to secure glass.
7. Tie a piece of string around your chalk. Make sure string is long enough for you to grab and write.
8. Press a tack into the corner of the frame This frame happened to have a space, so I just placed it in there. Tie other end of string to tack.
Hang your frame on a wall or place on a tabletop.
DIY: How to make new mirror look old without the harsh chemicals.
I have seen many projects online to age a mirror but most use an acid to remove part of the mirror... which didn't thrill me! I found common household bleach does the trick just as well.
If you were to flip over a mirror, you would see it's usually covered with a gray coating. Under the gray, there is a copper coating. This copper coating (it's sometimes a different color) is on top of a piece of clear glass. The copper coating is what makes the glass a reflective mirror. I had this cubby hole in my kitchen that I thought would be a perfect spot for my mirror project.
 |
| My Before and After Aged Mirror Project |
 | ||
| How to age a mirror without harsh chemicals. Facci Designs |
• Mirror
• Clorox Bleach
• Paint Scraper
• Paint Remover
• Gloves and rags
• Spray bottle
• Paint brush
• Black or dark gray spray paint
2. Work in an open, well-ventilated area. Here I am applying my paint remover...I should be wearing my gloves.
3. To remove the gray backing of your mirror to expose the copper-colored coating that covers your piece of glass, flip your mirror over and brush your paint remover onto the back completely covering the surface. Let set to manufacturers directions. Hint: Don't let it set too long, you want to remove all of the gray coating, but sometimes if you leave your paint remover on too long, it will remover the copper coating as well.
4. Here you can see how the paint remover has bubbled...it's time to remove it.
5. Even though I'm using a pretty safe paint remover, I still want to wear my gloves. Remove all of the paint remover with your scraper to reveal the copper underneath. Safely discard the remover. Clean off the excess of paint remover with a damp paper towel.
6. Add some bleach to a spray bottle and spray sparingly along the edges of your mirror...or wherever you want your mirror to look aged. The edges is where old mirror would've aged first. Let sit for a bit then wipe or dab off. (Maybe a few seconds to a minute) You can always wipe off a little to see if the bleach has removed the copper. If not, just spray some more.
7. This is what the bleach did to the surface. You want to be able to see through those spots to reveal clear glass.
8. Once you're happy with the amount of "spots" you removed, now it's time to paint over them. Wipe dry and spray entire back of mirror with black spray paint. You can also use a dark gray paint. Let dry. Your mirror is ready to be framed or used however you like.
I placed my mirror in a cubby, installed a shelf and to display some vintage glasses
DIY: How to make Halloween cupcake liner and coffee filter ghosts
This has got to be the easiest craft...scary easy, I've come up with for
Halloween. Gather the kids and have some fun! Let them draw some funny
or scary ghosts. Remember, only use BATTERY OPERATED VOTIVES.

1. Gather your supplies:
White Cupcake Liners
White Coffee Filters
Battery Operated Votives
Black Sharpie Marker
2. Flatten our your liners and filters
3. Draw a ghost face off-center of the middle of your liner and filter. 3 long dots does the trick...or treat!
4. Scrunch the paper over your fingers to form a tubular shape
5. Place over your battery operated votive
6. Enjoy the Booootiful Glow
Happy Halloween!
DIY Pine Cone Jewelry
Ah, pine cones. Nature provides us with so many sizes and shapes that
crafting with pine cones are fun and easy. You can make wreaths,
garland, pine cone trees, fire starters, ornaments, place cards,
decorations and more.

I've made frames and candle holders but I wanted to try making jewelry
with the tiny ones I find all over my property. I'm not saying this is
the kind of jewelry that will last forever, but it sure is fun for the
holidays.


SUPPLIES NEEDED:


Brush your pine cone with the glue/adhesive size, let dry a bit, but
keep tacky. Tear off a piece of gold leaf and drop your pine cone right
onto it. Roll it in the gold leaf and tap it into and around the scales.
Let sit for a bit and then brush off any excess leaf.
I used about 24 inches of string for my necklace. At about 12 inches, I wrapped the cord around the base of the pine cone making sure it gets into the "scales" and tied a knot. I embellished my necklace with beads and mini tassels. These would make great earrings as well. Your pine cone jewelry would probably last longer if you give it a coat of clear nail polish or clear spray.
Hope your friends will be pining over your new necklace this holiday season.
DIY Holiday Shadowbox
A shadow box is a "deep frame" that's used for
displaying 3D items...mostly mementos. I made this one to celebrate the holidays.
Here are the supplies you'll need:

I made the trees with green fabric, but green paper would work too.

I then added some white paint to the tops of the trees, brushed the trees with glue and sprinkled on some green glitter. I love how they sparkle.
For the wreath, I cut out a circle with the pinking shears, added green glitter, glued on a bow and adhered that to the top of the box.
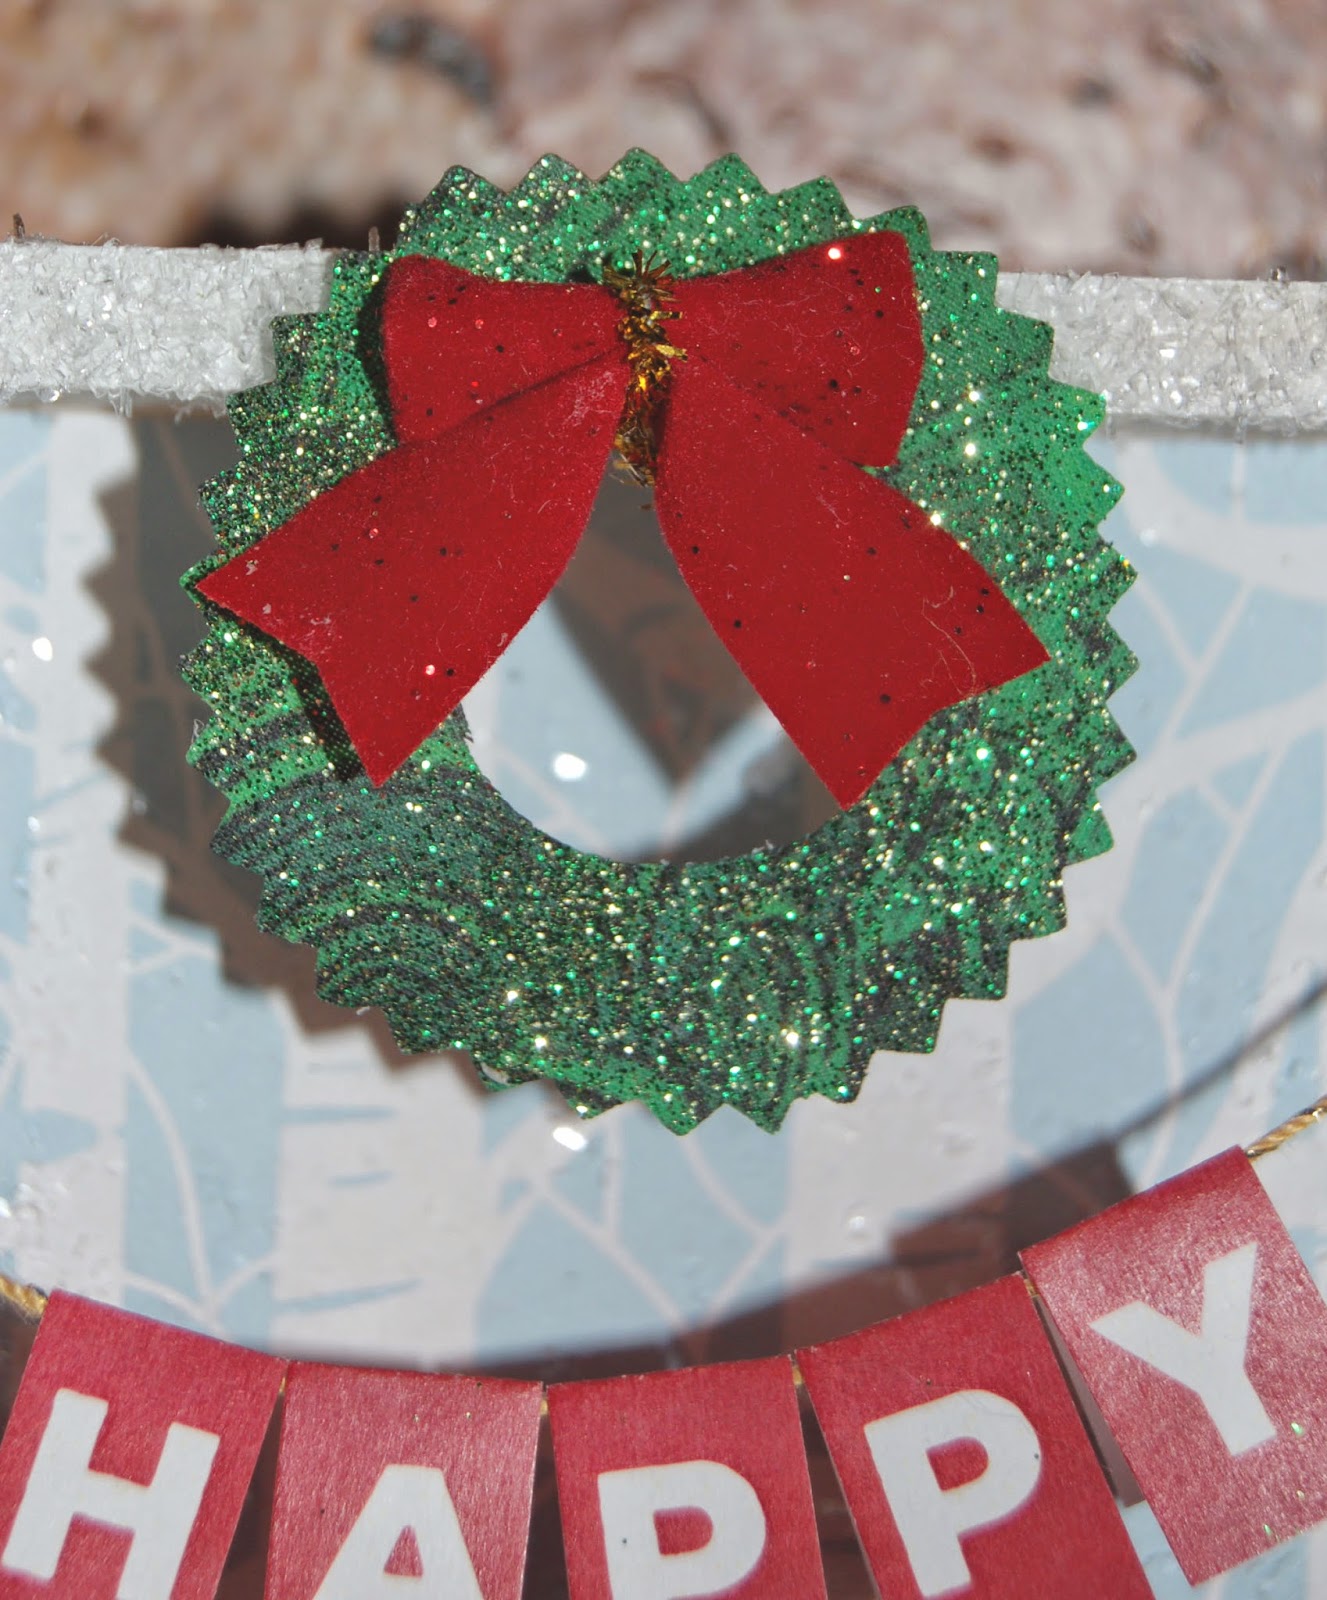
I lightly hammered the nails into the sides of the lid and strung my gold thread across. I cut out my banner message and folded each one over the gold thread. A bit of glue holds them in place.
Add your cotton to the bottom, glue down your trees and your deer. I embellished him with a little gold leaf...it is after all, the holidays.
Hang it on a wall or place it on a shelf. Create one every year and make sure to date the back! I believe beyond a shadow of a doubt, this will be a keepsake.
Happy Holidays!DIY Twinkling Twig Candle Holder
|
| Simple DIY Twinkling Twig Candle Holder |
1. Gather your twigs, I used Forsythia branches. 2. Cut them into smaller pieces. 3. Coat with Mod Podge. 4. Sprinkle on your glitter. 5 and 6. Cut off the top of your white cup, leaving about 1/2"of the bottom. 7. Apply white glue or use a glue gun, and press your glittered branches into the glue. Let dry, insert your candle and enjoy the twinkling glow.
Out of This World Papier Mache Project
Here are my DIY tips for creating the papier mache planets…Keep in mind that this is quite a labor-intensive DIY project!
I gathered an assortment of round balloons

I then created my papier mache mixture by mixing flour and water

I dipped strips of newspaper into the flour mixture

I applied three layers of strips to each balloon, allowing each layer to dry in between

On a damp day, this helped speed up the drying process

A closeup of the wet papier mache

Once dry, I painted each planet with a coat of white primer before applying the color. Then they dry again.. Rest the planets on flower pots!

I used acrylic paints. The colors are easy to mix and they clean up easily with water.

The first layer of color. Then more drying time. I also added a wire "hoop" to each planet so I could hang them.

A closeup of Neptune and Venus. With two coats of base color, a second darker or lighter color is sponged on to bring out the texture. A gloss coat is then sprayed on to give the planets some shine and protection.

The eight planets!

Feel free to email me at Lindafacci@yahoo.com with any questions
Click Here for How-To Video
Paper Roses
I wanted to try my hand at making papier mache jewelry. I Googled and found alot of papier mache beads but nothing like I had in mind. I've dabbled in jewelry-making for so long, so I thought I would use some of the techniques and supplies I've accumulated over the years. These 5 petal flowers were my first attempt at making a pin or with a ribbon attached to it, they would make great napkin ring holders!
I cut the each petal out of a file folder and starting applying a few layers of newspaper dipped in papier mache mixture.


I let them dry and then assembled the flower with the help of some tape. I then applied more layers of papier mache.

I let them dry and then added a thin layer of Celluclay to give it some texture, added a small mound to the middle and pressed in a cubic zirconia for some "bling". I painted them white, then a mixture of colors ranging from red, silver to gold...I couldn't make up my mind. But that's the fun part of these projects, when you wipe away some of the paint, you never know what your end result will be. But, I'm pretty happy with my flowers. Next time I make them, I might not add as much celluclay and just go with a smoother texture.


_____________________________________
Paper Jewelry
Here is more papier mache jewelry. I used Celluclay (a papier mache pulp) and pressed it into a mold.

I only wanted to use a portion of the design. I let it dry, trimmed it and sanded it into shape.

I attached some wire to the back to make some loops, carved a hole in the center and inserted a cubic zirconia to add some glimmer and sparkle. Painted it gold and attached it to some chain. Jewelry at a fraction of the cost.

Here are some rings I made. Kinda funky, first time doing it!


I really like your planets. I am an art teacher, and I am about to start to create planets with my gr. 4 students. I have 3 questions, What kind of hooks did you use and at what stage did you apply them? and where did you purchase round ballons?
ReplyDeleteHi there, sorry, just saw this comment. I just used paper clips because they bend easily to make a hook, I applied them when the planets were dry and before they were painted. I did have to papier mache over the hole after they were inserted. I got the balloons at my local card store. Hope this helps and good luck!
ReplyDeleteHi Linda.I would love to make the paper mache planets for my son's birthday.You mention that u applied the hook.Can you tell me exactly how.
ReplyDeleteAlso you seem to have shades of color on some of the balloons.Did that just happen naturally or did you have to shade it?
Lastly,It is okay to use plastic balls instead of balloons for the planets?
Hi, I just used paper clips because they bend easily to make a hook, I applied them when the planets were dry and before they were painted. I did have to papier mache over the hole after they were inserted.
ReplyDeleteBecause the surface is not smooth, the shading kind of happens when you rub paint off or then rub more paint on.
Plastic balls will be heavy but you won't have to put that many layers of paper on. Hope I answered your questions
Hey Linda! I really love the papier mache planets and I've been wanting to do this project for my room for a while. My question, however, is approximately how long did it take you to do this?
ReplyDeleteThank you. It took me an entire weekend, but I had a tight deadline. Give yourself a week and have fun!!
ReplyDeletehow did you get the ring around the planet and what did you use?
ReplyDeleteI used foam core and covered it with sparkly paper. I attached clear fish line to 3 areas of the ring and hooked the lines to the top of the planet hook, so it appeared to be floating.
ReplyDeleteI am going to attempt this with my daughter. Would you please share your most successful papier mache recipe, I haven't done it in ages and there are a ton, some heated, some with glue etc. Thanks!
ReplyDeleteFantastic! It's a lot of fun. It literally is just flour and tap water, stirred to the consistency of a light pancake batter. You could add a bit of white glue in it if you want but I find this works the best for this type of papier mache. Good luck and share your photos if you can!
ReplyDeletewhat are the measurements of the flour and water that you use and how did you get the effect from the paint
ReplyDeleteHi, I really can't say exact, but it should feel a little wetter than pancake batter. The painted effect comes from painting a few layers of different shades and then lightly rubbing the paint off with a damp sponge. The papier mache surface adds to the effect.
ReplyDeleteHi I'm wondering how exactly you inserted the paper clips? I had a friend that made some and she popped her balloons. lol Did you just thread the paper clip through the planet and then Immediately covered it with more paper mache?
ReplyDeleteHi Sierra, You can insert the paper clip when the balloons are dry, and then add a little more "paste" to adhere. you can use wire too. You could make 2 small holes and kind of loop through...might be a better option
ReplyDeleteHi Linda,
ReplyDeleteI was wondering how long the balloons last before they deflate (if they deflate)
The balloons don't last very long, almost as long as it takes for the piece to dry
ReplyDeleteFantastic effort - thank you for sharing. Now you've given me more work to do before school goes back so that I can get these ready for my classroom.
ReplyDeleteI only hope mine end up looking as good as yours.
HI Linda,
ReplyDeleteI have been trying to find a knitted felted pattern for a moose. Do you have a pattern for the one you made that you would be willing to share or perhaps know where I might find one? I appreciate any info you can provide thank you. Love your stuff- very talented
Hi Jeannette, Unfortunately I do not have a pattern. I just looked at a ton of pictures online. Good luck and thank you for visiting!
ReplyDeleteObat Tradisional Jelly Gamat
ReplyDeleteObat Radang Pita Suara
Obat Luka Di Anus
Obat Benjolan Di Lidah
Obat Bisul Di Dalam Telinga
Obat Penghilang Luka Jahitan
Obat Infeksi Usus Anak
Obat Pita Suara Rusak
Obat Sering Kencing
Thanks for sharing Walatra Gammat Emas Kapsul
ReplyDeleteI found it very useful to make a model of planets of a solar system
ReplyDeleteI really appreciate your efforts. I will definitely try this.
ReplyDeleteStickers2Go
i have read your blog, this is a very helpful blog thanks for sharing your guidelines.
ReplyDeleteCustom Stickers Printing
I Found the write place after lot of search on google. i am in write place where i can get an informative thing. Thank you for posting
ReplyDeletethis amazing post and trick, keep continue writing these amazing tricky informative blog.
Growing up should be fun for your babies; therefore, it is essential for you to get baby toys for kids that can help them develop physically and mentally. If you would like to buy toys for kids, walmart toys, toys for 1 year olds, cabbage patch kids, that will be instrumental to the growth of your kid, Fisher-Price Deluxe Kick and Play Piano is the perfect item you need.
ReplyDeleteThank you for posting this amazing post.Diseño Paginas Web Barcelona.
ReplyDeleteHere you can Buy real followers on Instagram
ReplyDeleteWe will also help you to Buy Instagram likes
We are here to help you to buy real Instagram followers at cheap rates. We also peovide services to get like Instagram likes.
ReplyDeleteIncrease your Igfollowers and like on ig.
ReplyDeleteMost of us want to increase their likes on Instagram even they are ready to buy likes. Here, they can get free like instagram
ReplyDeleteHere, they can also get viewers instagram free
Most of us want to increase their likes on Instagram even they are ready to buy likes. Here, they can get free like instagram
ReplyDeleteHere, they can also get viewers instagram free
Increase your Ig views and get free followers on Instagram.
ReplyDeleteft, Coast Guard Direct Access.
ReplyDeleteIf you want to read informative blogs, visit Koopjesblog.
ReplyDeleteIf you want to read very informative blogs about sales and discount, visit our blog.
ReplyDeleteRead our blog to get knowledge about Koopje.
ReplyDeleteThis article is extremely educational lastly I got what I needed. Thank you kindly for this Information.
ReplyDeletetransaction advisory services
There is many amzing feature in new smart phones than previousclick here to know about whats new
ReplyDeleteKnow about the new phone how work
Know about the appl's new phone i phone 12 max
know about the android and apple's working
know about the android development
Such a great post I like it very much keep it up.
ReplyDeletecolourful Die Cute boxes
bulk Donut boxes
I DO BELIEVE ALL OF THE CONCEPTS YOU HAVE INTRODUCED IN YOUR POST. THEY’RE VERY CONVINCING AND WILL DEFINITELY WORK. NONETHELESS, THE POSTS ARE VERY QUICK FOR NEWBIES. MAY JUST YOU PLEASE EXTEND THEM A BIT FROM NEXT TIME? THANK YOU FOR THE POST!
ReplyDelete섯다
HI! THIS IS GREAT INFORMATION THAT YOU PROVIDED TO US!
ReplyDelete19가이드03
slot siteleri
ReplyDeletekralbet
betpark
tipobet
betmatik
kibris bahis siteleri
poker siteleri
bonus veren siteler
mobil ödeme bahis
B42
دانلود آهنگ های جدید ایرانی شاد و ریمیکس آهنگ های ایران در موزیک ایرانی آهنگ جدید samira-212@
ReplyDeleteyou should keep update things like this, we love it !! ekotogel
ReplyDeleteشركة تسليك مجاري بالاحساء V8mYusjC7U
ReplyDeleteشركة تسليك مجاري في دبي FZom26uosw
ReplyDeleteشركة تسليك مجاري بالدمام wRxCZ19tz9
ReplyDeleteThis blog is absolutely fantastic! The content is not only informative but also engaging. I really appreciate the effort and detail put into each post. Highly recommended for anyone looking for valuable insights. For more great content, feel free to visit my website as wellDigital Marketing Services in Pakistan
ReplyDeleteO Office 2021 é ideal para pequenos usuários por várias razões:
ReplyDelete1. Licença Vitalícia: Diferente das versões por assinatura, o Office 2021 oferece uma licença vitalícia, permitindo que o usuário pague uma vez e tenha acesso ao software para sempre, o que é mais econômico para pequenas empresas ou usuários individuais.
2. Ferramentas de Produtividade Completa: Ele inclui todos os aplicativos essenciais como Word, Excel e PowerPoint, com recursos suficientes para atender às necessidades diárias sem a necessidade de uma assinatura de nuvem.
3. Fácil Integração e Uso Offline: O Office 2021 funciona bem offline, o que é uma vantagem para usuários que não precisam de armazenamento em nuvem constante, permitindo produtividade sem depender de uma conexão de internet. https://nortadownload.com/ativador-office-2021/
شركة مكافحة النمل الابيض بالخبر 5c2I7PSWqL
ReplyDeleteMany patients fear withdrawal pain. Our Ghaziabad Nasha Mukti Kendra ensures pain management and emotional support during detox. Nasha Mukti Kendra in Ghaziabad
ReplyDeleteشركة تسليك مجاري بالاحساء gvFSPDL1fj
ReplyDeleteتسليك مجاري بالاحساء
ReplyDelete4sa741oiIh