Pages

Monday, December 29, 2014

Insulating the Bedroom and Bathroom Crawl Space

It's amazing how much Gene is able to do by himself on our stone house. But, he can always use an extra pair of hands and I want to help him as much as I can. So I put on my Tyvek suit, respirator, gloves and a hat...I was ready to go under.

It's nasty work, but someone has to do it. If you're claustrophobic, this job and the 2nd video may not be for you!

Before you can insulate, you have to measure and cut. Gene would give me a number and I would cut to size.


CLICK HERE FOR VIDEO
That was my main job. Gene did most of the dirty work, but I did have to crawl under myself. Take a look below.
CLICK HERE FOR VIDEO

Now our bathroom and bedroom will be extra cozy!

Tuesday, December 23, 2014

A Heart Felt Holiday Love Story

Here's a little stop motion video I created of Lindy and Geno building a snowman. I wish all of my followers and visitors a very Happy Hanukkah, a festive Merry Christmas, and a joyful Happy New Year!

CLICK HERE


Friday, December 19, 2014

Stone House Renovation: Preparing stone wall

Here's a video of Gene preparing the fireplace wall. He's installing strips of wood over the stone (it's called "furring") so we can level out the surface for our finished wall. We thought about keeping the stone exposed, but it's not in really good shape and not that attractive up close.

We want to do something fun and interesting with it, so we're going to cover it with plywood first and then create a pattern with rough hewn wood. We think the contrast of the wood and stone will be a great focal point in the living room.


Or click here

Monday, December 15, 2014

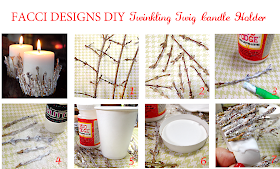
DIY Twinkling Twig Candle Holder

Simple DIY Twinkling Twig Candle Holder


Here's a simple and festive DIY candle holder project.


1. Gather your twigs, I used Forsythia branches. 2. Cut them into smaller pieces. 3. Coat with Mod Podge. 4. Sprinkle on your glitter. 5 and 6. Cut off the top of your white cup, leaving about 1/2"of the bottom. 7. Apply white glue or use a glue gun, and press your glittered branches into the glue. Let dry, insert your candle and enjoy the twinkling glow.


Closeup of Glittered Branches


Saturday, December 13, 2014

DIY Holiday Shadowbox

A shadow box is a "deep frame" that's used for displaying 3D items...mostly mementos. I made this one to celebrate the holidays.


Here are the supplies you'll need:


I used a wood box I had on hand, separated the two pieces and worked with just the lid. I painted the lid white, printed out the background art and glued that to the inside. I added some glue to the outside rim of the box and sprinkled on some white glitter.

I made the trees with green fabric, but green paper would work too.


I then added some white paint to the tops of the trees, brushed the trees with glue and sprinkled on some green glitter. I love how they sparkle.

For the wreath, I cut out a circle with the pinking shears, added green glitter, glued on a bow and adhered that to the top of the box.


I lightly hammered the nails into the sides of the lid and strung my gold thread across. I cut out my banner message and folded each one over the gold thread. A bit of glue holds them in place.

Add your cotton to the bottom, glue down your trees and your deer. I embellished him with a little gold leaf...it is after all, the holidays.

Hang it on a wall or place it on a shelf. Create one every year and make sure to date the back! I believe beyond a shadow of a doubt, this will be a keepsake.

Happy Holidays!


Monday, December 8, 2014

DIY Pine Cone Jewelry

Ah, pine cones. Nature provides us with so many sizes and shapes that crafting with pine cones are fun and easy. You can make wreaths, garland, pine cone trees, fire starters, ornaments, place cards, decorations and more.

I've made frames and candle holders but I wanted to try making jewelry with the tiny ones I find all over my property. I'm not saying this is the kind of jewelry that will last forever, but it sure is fun for the holidays.


SUPPLIES NEEDED:

Brush your pine cone with the glue/adhesive size, let dry a bit, but keep tacky. Tear off a piece of gold leaf and drop your pine cone right onto it. Roll it in the gold leaf and tap it into and around the scales. Let sit for a bit and then brush off any excess leaf.

I used about 24 inches of string for my necklace. At about 12 inches, I wrapped the cord around the base of the pine cone making sure it gets into the "scales" and tied a knot. I embellished my necklace with beads and mini tassels. These would make great earrings as well. Your pine cone jewelry would probably last longer if you give it a coat of clear nail polish or clear spray.

Hope your friends will be pining over your new necklace this holiday season.


Saturday, December 6, 2014

My afternoon with the very talented animator Rachel Ryle

If you're not an Instagrammer you may not know who Rachel Ryle is, oh but one day you just might. Here's a little bio... and you must visit her site to be amazed:

"Award winning Illustrator & Animator Rachel Ryle is a social media maven of sorts. Having been named the #1 Instagram account to follow by MTV & BuzzFeed, she focuses on incorporating her art & animations into her posts. Since the launch of Instagram’s video feature Rachel has turned her stream into a collection of art & quirky stop motion animations. In only 15 seconds her short story animations are bound to leave a smile on your face. "

Rachel Ryle and me


Last year we met at Magnolia Bakery to discuss a potential partnership. During that conversation, we also discussed the phenomenon of Instagram and how I could get started. She encouraged me to create a story or character with my needle felted animals. So, I created 31 stop motion animations, called "A Heart-Felt Love Story" telling the story of how my husband and I met. You can see them here.

A Behind-the-Scenes look at "Lindy cooking dinner for Geno"


Rachel happened to be in NYC once again so we got together to discuss creating something fun and unique for Magnolia Bakery and to just catch up on the life of creating.

I wanted to thank Rachel for all her inspiration so I gifted her with this little mouse. She was staying in Williamsburg Brooklyn, so she named him William S. Burg...the perfect name for this mouse.

Facci Designs needle felted mouse, William S. Burg


Wednesday, December 3, 2014

A Candy Jar Winter Wonderland Globe

Here's a fun project to do with the kids. Any jar would do but I used a small candy jar with a fancy lid.


Here are the supplies you'll need.


The lid of your jar will become the base of your globe. Place a sticker on the front of the jar and on top (to let some light in) and paint your jar.


While the paint is wet, sprinkle on some glitter. Let dry and carefully peel away stickers. Adhere the pearl trim around the outside of your openings. Glue on your bow or embellishment of choice.


Cut a styrofoam ball in half and place inside lid. Depending on what type of lid it is, you might want to add some fake snow or cotton around to hide the styrofoam. Glue your animal (or a mini Christmas tree!) to the styrofoam (a glue gun might be your best bet here).

Find some background art you like, it could be a photograph or a drawing or use mine! Place in back of jar. I didn't need to glue it, it just stayed in place. Place jar on lid and enjoy!

The jar looks best when it is near a light source.

Happy Holidays!


Monday, December 1, 2014

Before and After Dutch Door Revealed

To create more kitchen wall space, the former owner covered up a charming Dutch door that leads out to the courtyard.

Well, we couldn't have that! I have a thing for dutch doors...we have one in our Woodstock cottage. And, its as short as this Dutch door. I'm constantly telling people to duck before they come in... I guess I'll keep telling them.


Kitchen Before

Viola!
 
The door with all its original hardware intact


Me and my respirator. A must-have accessory in this old house.

Monday, November 24, 2014

A 1940's Stone House Renovation

Last summer Gene and I stayed at a friend’s farmhouse in Pennsylvania. After spending just a night at their house, I realized I wanted a bigger house.

I want to be able to have friends and family stay over…in a bed and not on an leaky air mattress in my tiny living room. I want to be able to have more than 4 people at my dining table… hell, I want a dining room where I can have a dining table. I love my tiny Woodstock cottage and we always planned on growing old there, but having more space would be kinda nice. I would be able to entertain more, and I really like that idea.

So, the search began. Gene and I were looking for a fixer-upper. We love renovating, it’s what makes us happy and well, it's within our budget.

This past June I was searching online and found a beautiful 2 bedroom stone house built in the 1940’s. Included on the 3 acres, was a 1 bedroom cottage and a garage with an adjacent room. Bonus! More room for more guests.

The photos looked beautiful, but after touring the house and taking a much closer look, we realized it had been neglected and needed a lot of love…definition: work. We made an offer and waited and waited and waited. It was a short sale, which we would find out is anything but short. Well, we closed last week and have already starting the demolition.

The property is just gorgeous, with fruit trees, a stone courtyard, stone paths and steps, some leading to nowhere. A sign on the fence says "Storybook". All 3 units have stone fireplaces. We would later find out a stonemason built it all, a rather vertically-challenged stonemason since all the doorways are very low. :)

We're looking forward to the renovation and I hope you'll follow us on our journey. I’ll be posting before & after photos of all the home projects we plan on doing. They’ll be some DIY’s thrown in there as well. We hope to write our own story book and we hope you'll read it or at least look at the pictures!


A Hobbit Door    
Steps to Courtyard


Courtyard


Sunday, November 16, 2014

A Martha Stewart Living Invitation to create with Sprout by HP (part 2)

A week ago I posted about the Sprout by HP event I was invited to by the team at Martha Stewart Living and today I want to tell you all about on my once-in-a-lifetime invitation by Martha Stewart Living to create my own project using the new Sprout by HP!

Martha Stewart Living invited three bloggers to design with this new technology. We would be part of just a few lucky people who would have this opportunity to try out Sprout by HP. How exciting!! It was tough to keep it a secret, but I managed! 

I was assigned holiday wrapping paper and a holiday gift tag using my needle felted animals. I chose my fawn and moose.


I was a bit nervous, especially since this was a new program AND (that’s a big AND) I’ve worked on a PC maybe once in my life…so this would be my second. Let’s hope it goes well.


The design is built around a concept HP is calling “blended reality” that blends the 3D physical world with our 2D digital one.


I got a simple tutorial and I was on my way. Well, it turns out Sprout by HP is super intuitive. Whew!


The HP Sprout has a giant touch mat which is the primary point of interaction and a downward facing projector/camera that scans objects and then lets the user manipulate them in 2D or 3D.


I decided to create a pattern. I was allowed into the Crafts storage area (WOW! I could die happy in there) and it was super overwhelming in a fantastic way, but my time was limited, so I chose a few simple items to help me with my project… some ribbon, bows and gift tags. I placed them on the touch mat and pressed the camera button. I then placed my animals on their sides and took their image as well. 

Viola, in a split second, there were my items on the screen in their full 3D glory. 


This technology also allows the user to remove the background art of your image by outlining the areas you want and don’t want, but I decided to use my images against a white background so there was no need for retouching. I saved all to a folder.


The HP Sprout is so hands-on. 

I located my images from the folder and dragged them from the screen to the touch mat.  

With a tap and a pinch, and a few clicks I was able to rotate, resize and duplicate my images.  

For instance, the ribbon wasn’t long enough, so I just duplicated it a few times to create the length I needed. You can also crop out whatever you don’t like or need. I was also able to flip images like I did with the deer.
 
I created 3 different wrapping paper patterns and 3 holiday tags


I added a message by selecting the type tool. Here I got the chance to choose a font, color and size. I also chose to hand-write part of message right on the touch mat…and no keyboard or mouse was used. I used the tip of my finger directly on the touch mat to create blue dots for “snow.” All these elements can then be grouped and duplicated to create my pattern…which made it much easier to move around.


I wanted to stay longer and play all day, but my time was limited and there were other bloggers waiting.


I can't wait to hand out my custom-wrapped gifts this Christmas!


Sprout means to spring up, to grow, to develop…so, I look forward to HP developing more and more programs for us creative types! 


 To find more information and happenings about Sprout follow the hashtag: #sproutbyhp

Also, check out what the other bloggers created: inmyownstyle and fatveganbaby


Monday, November 10, 2014

A Martha Stewart Living Invitation to the Sprout by HP event (Part 1)


Warning: Put your glue gun down and step away from the mouse!

Wikipedia defines a geek as a person that utilizes new technologies to do interesting things. A nerd as someone that knows all about new technologies as well as popular culture, and collects those things and considers them “cool”. Dweeb: Someone confused about exactly what technologies really are, and has less discretion in what they think is cool.

I’ve never seen so many Geeks and Nerds in one place at one time. And, yes, there were a few Dweebs mixed in as well...I guess I would be one of them. Now if you’ve read the definition of a Dweeb, they have less discretion of what is cool...but let me tell you, I know what’s cool, my morning at the unveiling of Sprout by HP.

I was invited by Martha Stewart Living to attend an event announcing the new Sprout by HP, a 3D-scanning, multi-display all-in-one PC. Why me? Because HP is trying to reach a creative audience. I don’t even know how to use a PC - but I was looking forward to learning more.

The event was held downtown in a large open space across from the HP offices. Breakfast goodies were served as guests, press and speakers mingled. The first part of the presentation was to announce HP’s new 3D printer, the second on the HP Sprout, the third and final part - the unveiling of the technology and to see firsthand, Sprout in action.

The design is built around a concept HP is calling “blended reality” that blends the 3D physical world with our 2D digital one.


I am such a hands-on kind of gal. I’m a crafter, a maker, a tinkerer. So, I was skeptical on what the HP Sprout could do for me, especially since it’s a PC and I’m a true-blue Mac user. Well, I was pleasantly surprised.

The HP Sprout has a giant touchpad which is the primary point of interaction and a downward facing projector/camera that scans objects and then lets the user manipulate them in 2D or 3D. Cool.

I’m thinking to myself, “hmm, my needle felted animals are so sculptural and 3D, once scanned, they would be represented in their more natural form." Cool again. I could then manipulate them, by rotating, reducing, enlarging and even removing the background art by tapping, pinching and dragging all without a mouse or keyboard (there is a virtual keyboard if needed). I like the idea of using my hands instead of a mouse.

Erin Furey, Associate Crafts Editor of Martha Stewart Living and Martha Stewart Weddings was there demonstrating the HP technology in conjunction with the Martha Stewart CraftStudio app, which comes with the HP computer. How cool is that? She was scanning real butterflies in Sprout, then designing with them in the app. I watched as she dragged images from the main screen to the Touch Mat...like magic. Then she hand-wrote a message right on the Mat, changed colors, resized, and more - no keyboard or mouse was used.

I think that designing flyers and invitations will be so much easier, all with a touch and pen input. In other words, a more hands-on approach. This would definitely speed up my workflow.

The HP Sprout was built for people like me or as one of the speakers said - “so that the crafter in Maine can put away her tube of glue.” The HP Sprout will enable all of us to create...hands-on. And, I think that's a cool thing. 

Yummy breakfast; big crowd; hands-on demonstrations; posing with fellow bloggers, Diane Henkler, Jessica Shaool and Ron Coughlin, Sr Vice President and General Manager Consumer Personal Systems/HP; Erin Furey drawing away...
 

In the meantime, Martha Stewart Living has extended a once-in-a-lifetime invitation to create my own project using Sprout by HP.  I can’t wait to try it and tell you all about it. Stay tuned. 

#sproutbyhp 

Wednesday, November 5, 2014

Needle Felted Otter Wedding Cake Topper

Ever since I made a custom squirrel wedding cake topper for a friend, cake toppers have become my biggest seller. And being featured on MarthaStewartWeddings.com doesn't hurt either.

I was recently commissioned to create a needle felted Otter cake topper. It's always a pleasure to make someone's wedding day that much more special and unique to them. And, it's always fun for me to craft a new animal. I had never made a needle felted otter before but I'm quite happy with the outcome...and I hope the bride and groom are too!
A pair of needle felted otters   


Tuesday, October 28, 2014

Oh dear, it's a Needlefelted deer

Here's a little stop motion video I put together for this dear deer. Sorry the resolution is so low


Tuesday, October 21, 2014

"Mercury Glass" Spooktacular Halloween Votives

Here's a fun project for Halloween. For How-To instructions, click here.